MOD64 Setup |
  
|
MOD64 Setup |
|
In order to access the parameters of a device, select this device and clique the Setup button. After entering the access code required the system shows the device functions.
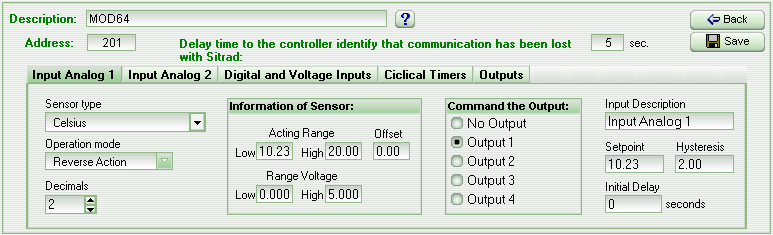
This setup screen differs from other devices. As we can see, the screen has a field to change the device address number (the factory setting is 201), a field to specify the maximum amount of time allowed for the MOD64 to operate without communication with SITRAD; and a guide with the following tabs: Analog Input 1, Analog Input 2, Digital and Voltage Inputs, Cyclical Timers and Outputs.
You can click the help button (blue question mark) to make the system show the description for the field selected.
Select the tab for the input you intend to use and follow the steps below to configure the analog input:
- Specify the type of sensor to be used.
- Choose the input operation mode. Reverse Action will make the stand-alone control to use the setpoint+hysteresis in the following way: if setpoint equals 10 and hysteresis equals 2, the input stand-alone control will activate the output linked to this input when the sensor value is 12 and deactivate it when the value is 10. In the Direct Action, for the same configuration, the output will activate when the sensor value is 8 and deactivate when it is 10. In the cases of Alarm (Inside of Limits Range and Outside of Limits Range), the Setpoint and Hysteresis fields become Minimum Limit and Maximum Limit, respectively.
- Specify how many places of decimals must be considered from the input value measured.
- For the Sensor data specify the minimum and maximum value to be measured by the sensor (range limits) and the minimum and maximum voltage to be used by the sensor. Note that only sensors with linear measurement can be used. Example: if a sensor works from 0°F to 80°F and operates from 0 to 5 volts, when the analog input reads 0 volts the temperature shall be 0°F. When it reads 5 volts the temperature shall be 80°F. When it reads 2,5 volts the temperature shall be 40°F.
- In the Command the Output box choose the output the analog input will activate. If you intend to use the input only for monitoring a value without controlling an output, choose the option No Output.
- Type in a name for the input.
- If you choose an output to be controlled, specify the Setpoint and the Hysteresis (the maximum and minimum value in this case) and alarm. Specify the Initial Delay (minimum time elapsed before turning ON an output after having turned it OFF).

Select the corresponding tab in the configuration guide to configure the Digital and Voltage Inputs.
You can specify for each input an input description; the operation mode; if the hour-meter will be used to register the amount of time the input is turned ON; whether the hour-meter will be reset or not when the input signal disappears (if it is not selected to be reset, the hour-meter will register the total amount of hours the input signal was present, ignoring the periods the input signal disappears.)
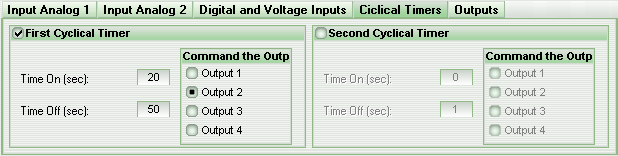
If you want to use a cyclic timer select the corresponding tab in the setup screen and select the check box in its upper left corner. Type in the Time ON and Time OFF values and select the output to be activated by this stand-alone control.
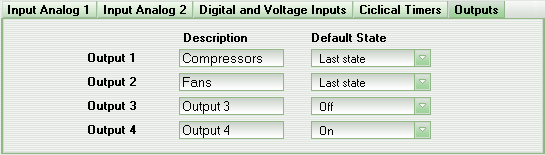
The last tab provides the output configurations. Specify the output description and default state as a safety procedure. The output returns to the default state if the communication with SITRAD is lost. The Default State can be ON, OFF and Last State (current state). If the output is controlled by an internal stand-alone control (analog input or cyclic timer) the output default state will be always the Last State.
After configuration is finished click the Save button to send the configuration for MOD64. If device address is changed, the SITRAD must be closed and opened again for the new address to become valid and start operating properly.
See Also
URL of this page