Using the Virtual Alarms |
  
|
Using the Virtual Alarms |
|
The virtual alarms are controlled by the system to warn the user of any abnormality with the instruments or facilities.
To input the virtual-alarm control data for an instrument, you have to highlight it then click on the Virtual button in the information panel. Then a dialogue box like the one below will appear.
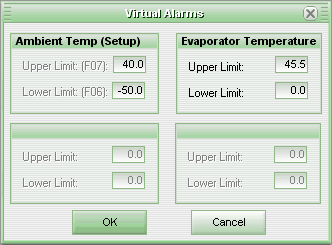
Type the limits in the dialogue box for the instrument's variables, then click on the OK button. When the variable amount is outside the established interval, the virtual alarm will go off.
Some models have alarms in the instruments themselves, and the limits must be informed during setup. Thus, in this dialogue box, the limits will only be shown for consultation purposes.
Note:The limits may be shown in the graph to demonstrate the period in which the variable measured was outside of the configured interval.
To configure the actions to be run when a virtual alarm is set off, click on the menu item Configuration, Virtual Alarms then on Options.
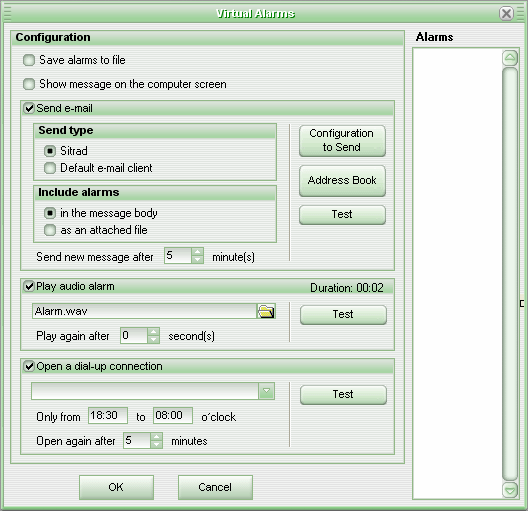
In this dialog box (above) the user can select whether the system must save the alarms in a file, send a message, sound an alarm and/or open a dial-up connection.
Saving alarms in a file
When this option is chosen, the file created will have the name AlarmesVirtuais.txt and it will be located in the system's installation directory.
Show message on the computer screen
When a virtual alarm occur, the Sitrad will show a message box in the screen of the computer to informing that have station alarmed set.
Sending electronic messages
For the system to send electronic messages, the user should turn on the Send electronic message option. The system has two ways to send it:
- Sitrad: The system itself sends it. To do so, a few parameters have to be configured;
- Default e-mail client: The default electronic mail installed on the computer sends the message.
To include alarms in the body of the message, mark the option in the body of the message on the Include alarms panel, but if you want to receive the alarms as an attached file, the option as an attached file must be marked.
To set the interval for resending messages, select the desired time in the Send new messages after "N" minute(s) option.
If the system sends the messages, some parameters will need to be set. To do so, click on the Configure button and the following dialogue box will appear.

In this dialogue box, the data referring to an email account should be provided, which the system will use to send the messages. The data are as follows:
- Name of who is sending the message, that is to say, the holder of the email account;
- Email address of the sender, that is to say, the account address;
- Address of the server sending the emails (SMTP);
- The user password to access the e-mail account. The encrypted password is stored in the database.
- If the SMTP server requires secure connection, check the “Use secure authentication (SSL)” option.
Click the ![]() button to display a list with some pre-configured email servers.
button to display a list with some pre-configured email servers.
If the email outbound is sent through the default email client, it is possible to choose in the “Default email client” box which application installed in the computer will be used to send the message.
After configuring the information for sending electronic messages, click on the OK button to confirm the configuration.
To provide the names of the people who will receive the messages, click on the Address Book button. The following dialogue box will appear.
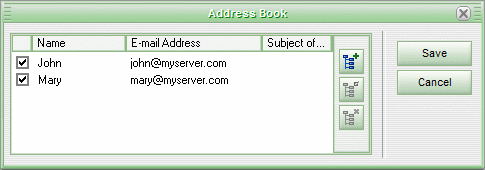
In this dialogue box, it is possible to do maintenance on the catalogue of people's addresses that will receive the electronic alarm messages.
Use the buttons at the right side of emails list to Include, Edit and Remove items from the address book list.
To deactivate the sending of messages to a certain person, uncheck the box alongside their name.
After having made all of the desired modifications, save them by clicking the Save. To discard all of the modifications, click on the Cancel.
To send a mail message, click on the Test . A mail message will be sent to everybody listed in the address catalogue.
Note: To send alarms to mobile phones it is necessary to check with the wireless carrier the form that is available to convert an e-mail into SMS message. The wireless carrier Web site page will probably explain the details in the “Services” tab. The most common way that the wireless carriers accept this operation is through an e-mail address such as “05199994357@mobile_carrier.com”. When an e-mail is sent to this address it will be forwarded to the mobile phone number “05199994357”. Please call your wireless carrier for questions about service rates or availability.
Issuing an Audible Alarm
For the system to issue an audible alarm, the user should be qualified to activate the Issue Audible Alarm option.
Then select an audio file (wave format), clicking on the Open button alongside the box reserved for the name of the file. In the Open dialogue box, you find the desired file and then click on the Open button. The name of the file will be displayed, as well as its duration.
To configure the interval between the reproduction of the alarms, provide the time desired in the field Issuance again after "N" second(s).
To test the functioning of the alarm, click on the Test . At this point, the Test button will turn into a Stop button so that the user can interrupt the test. During the test, the system will issue the alarm, wait the time configured, and then issue the alarm again.
Open Dial-up Connection
For the system to open a dial-up connection enable the Open dial-up connection option and then select in the combined box list a dial-up connection previously registered in the Windows network connections.
It is also possible to choose a time period of the day in which the dial-up connection can be open. In this case input the period in the field “Only from hh:mm to hh:mm o’clock”.
This feature is very useful for those who want to receive a phone call (mainly at night) reporting the Sitrad alarm. In this case you must register the receivers’ phone numbers in the proper fields for dial-up connection provider phone numbers. Therefore, when the receivers receive a phone call from the place where the Sitrad is installed and nobody speaks, that means the Sitrad server is informing the Sitrad is alarmed.
See Also
URL of this page